What is the best way to connect a 3-port solenoid to an external wastegate?
Bottom port only, or both ports?
There are two main ways to plumb the boost control hoses to an external wastegate. Connect the solenoid to just the bottom port, or run constant boost to the bottom and plumb the solenoid to the top port. Everyone has their preferred method and their own reasons for that preference. When we have a look at the forces involved in each scenario, we can see that there is no difference at all!
In an external wastegate, there are 4 forces that control the movement and position of the valve:
- Spring, pushing valve closed
- Exhaust backpressure, pushing valve open
- Pressure applied to the top port, pushing valve closed
- Pressure applied to the bottom port, pushing valve open
A wastegate operates using a pressure differential across the diaphragm, and force exerted on the diaphragm by a spring, along with the exhaust backpressure trying to push the valve open. Once the sum of all the opening forces exceeds the closing forces, the wastegate will open.
A boost controller pulses the solenoid at a duty cycle to adjust the percentage of boost pressure applied to the diaphragm, which in turn allows control over the boost pressure at which the wastegate will open.

Let’s have a look at how the two solenoid connection methods affect the forces.
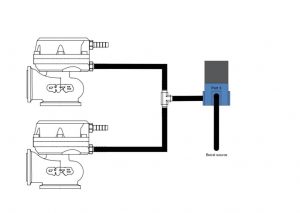
Figure (1) is often referred to as the “basic setup”. Using only the bottom port of the external wastegate, this is a simple way to plumb in your electronic boost controller. In this setup, the top port of the wastegate is left open to atmosphere, and therefore no pressure or resulting force is applied to the top of the diaphragm. The pressure differential then is only related to the pressure applied to the bottom port of the wastegate. By altering the pressure applied to the bottom port, the wastegate position (and therefore boost pressure) can be controlled.
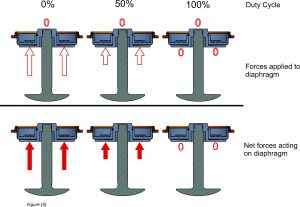
The diagram below shows three different scenarios, all using the single port setup. With this setup, the pressure in the top port will always remain zero, and the solenoid will bleed off air to adjust the pressure in the bottom port. The way the solenoid is plumbed in Figure (1) means that at 100% duty all the air is bled off and none is delivered to the wastegate. At 0% duty all the air is delivered to the wastegate. The diagram shows the forces on the diaphragm in play at 0%, 50%, and 100% duty cycle. Note that this is only showing the forces applied on the diaphragm by boost pressure. The spring force, and the force acting on the valve from the exhaust back pressure are not shown. These forces will not change, regardless of how the solenoid is installed.
The second method for plumbing an external wastegate uses both ports. In contrast to the first method, we are now going to keep full boost pressure in the bottom port and alter the pressure in the top. It’s often believed that by adding pressure to the top port we can combat boost taper in applications with high exhaust back-pressure, however when we look at the pressure differential, we can see that this is not the case.
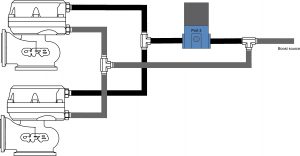
Figure (4) depicts the same 3 scenarios. This time however the two-port setup is used. Full boost pressure is now applied to the bottom port, and the solenoid adjusts the boost pressure in the top port. As noted in Figure (2), the solenoid is plumbed differently compared to the single port setup. At 100% duty, all the air is delivered to the wastegate. At 0% duty all the air is vented to the atmosphere, and none is delivered to the wastegate.
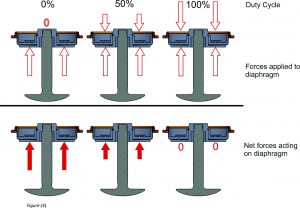
As we can see from figures 3 and 4, the net forces acting on the diaphragm as a result of boost pressure are identical for both setups.
So it really doesn’t matter which method you use, the end result will be exactly the same. The basic one-port setup is simpler, uses less hose, and doesn’t need any tees. However, the upper port of the wastegate is left open, and if there is any risk of water or dirt getting in, the two-port setup might be preferable.
Neither system will place any more risk that the other to your engine or turbo, so feel free to experiment and make up your own mind on which works best for you.
What if I have two wastegates? How do I set up the solenoid?
The answer to this question is simple. The concepts behind the boost control system remain the same, so the same principles are used to run both wastegates.
The boost supply hose can come from either a single source (preferably downstream of any merge) or be tee’d into both turbochargers. Similarly, the hose running from the solenoid to the wastegate can just be split and run to each wastegate.
Below are some diagrams that depict the two methods, adapted for use with two wastegates.
